
We had a 2014 Jeep Cherokee come into our Bellevue, NE facility with a concern stating the transmission was not shifting. This vehicle was equipped with a 3.2L engine and a 948TE transmission, and the vehicle was also all-wheel drive. I was informed when the vehicle was dropped off that they had it at a different shop for this same issue. Luckily for me, it was a shop that we do business with, and I know the guys over there. So, I called them first just to see if they did any repairs were attempted, or if they did a deep dive into diagnosing the issue. They said that they did not have any experience with the nine speeds, so they opted to refer their customer to us.
As with every other vehicle that comes in the door for diagnostics, I started off with the scan tool plugged in to check for any codes that were stored or active. I did retrieve two codes, one of which was stored and the other was active. I then proceeded to take the vehicle on a short road test to duplicate the customer's concern. I found that it had harsh reverse and drive engagements, which is to be expected when in failsafe mode. When in drive, the transmission was stuck in fourth gear and would not shift. I stopped the vehicle and shut it off so I could clear the codes to see if that would restore the correct operation. After doing that, it went right back into failsafe indicating a current fault. I rescanned the vehicle and retrieved only one of the two codes, which was the previously active one.
The codes that I initially got were P0973 (shift solenoid one control circuit low) and P1DB2 (actuator supply voltage "A" circuit). The P1DB2 code was the one that was active and the one that came back right away. I headed back to the shop for further diagnosis.
Once back at the shop, I did my normal visual inspection and battery system test. The battery visually looked to be in good shape and the battery and alternator were functioning correctly as well. Now, this vehicle was also equipped with the auto start-stop system which includes an auxiliary battery. At one time I'd had another vehicle with this same setup that also had some voltage codes, and replacing the auxiliary battery fixed the issue. I went ahead and tested the auxiliary battery, and it tested just fine so I ruled that out as a cause. I did check the fluid level and condition to make sure nothing abnormal was found, and everything checked out normally.
My next step was to get some information on the codes and what criteria the TCM (transmission control module) uses to determine a fault that sets it into limp mode. I pulled up some wiring diagrams and a description of the codes. After reviewing this information, I now knew I needed to dive into some electrical testing and needed to have the manager contact the customer to get some electrical diagnostic time sold.
After getting the customer's approval to go ahead, I began the process. I went after the P1DB2 trouble code since that was the one that was active and came right back after clearing them. When this code sets, an open or short has been detected on the solenoid supply one, or solenoid supply two circuits. I would need to test each of these circuits in order to pinpoint a possible fault.
Armed with my wiring diagrams and testing procedures, I first checked for the proper voltage supply to the transmission. On this vehicle when the case connector is disconnected and the key is turned on, it will not supply the full 12v; it defaults to approximately 2.5v. I verified on both solenoid power supply wires (SS1 & SS2) that 2.5 volts were present. Next, I needed to check all the internal solenoid supply #1 related circuits for an open or high resistance, which included six different solenoids. They all checked out fine. I then needed to do the same for the internal solenoid supply #2 related circuits, with only four of them on this circuit. I still didn't find anything incorrect. Up next was checking for a short to ground on all the same circuits I just tested for an open, and I did not find anything incorrect there, either.
Next, I disconnected the TCM and checked the wires from the TCM connector to the case connector for any opens or high resistance. Every one of the wires tested out normally. The last step in this testing procedure was to check the external solenoid low-side driver circuits for a short to ground. Once again, I still got the same correct results. Now I was getting a bit confused since I had proper voltage and good grounds with no excessive resistance or shorts. Now, I've learned from my experience that intermittent electrical problems don't just resolve themselves, and since it would set the code and go into failsafe right away, I knew I was missing something in my process.
I decided to plug everything back in and look over the scan data. Well, wouldn't you know it, the transmission was no longer in the failsafe, so I decided to take it on a drive, thinking maybe I needed to get it hot again. It worked totally fine on the test drive, I thought to myself, how could this be? I brought it back in to look over everything I touched, knowing I moved the harness around during testing. I looked very closely at the main harness from the TCM to the case connector (which is buried and a little hard to access the entire thing), and I found a spot in the harness that looked odd. Keep in mind, I didn't see anything out of place or any bolts that looked to have been touched recently, but I did see this bracket right next to the harness that was a little close to it. (Figure 1)
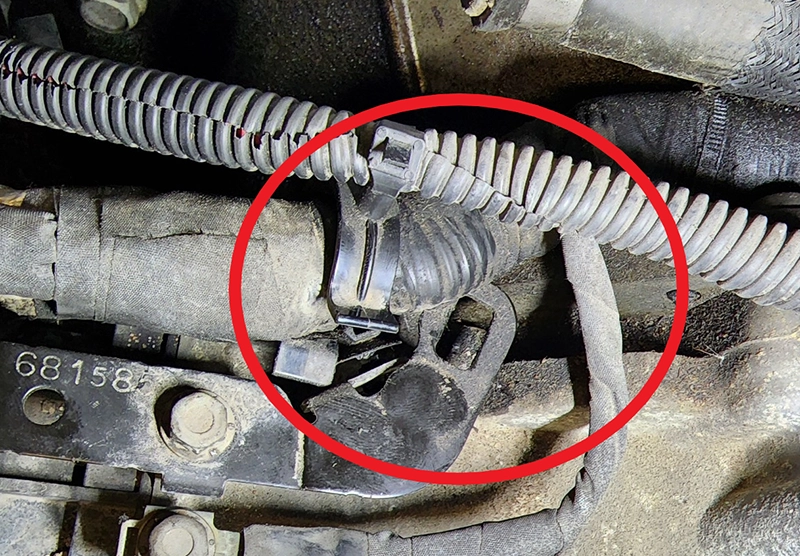
Figure 1
I removed the bracket and pulled the harness all the way up and found the solenoid supply #2 wires looked to have been rubbing on this bracket. I cut the split loom a bit to verify, and sure enough, that was where the issue was located. (Figure 2)
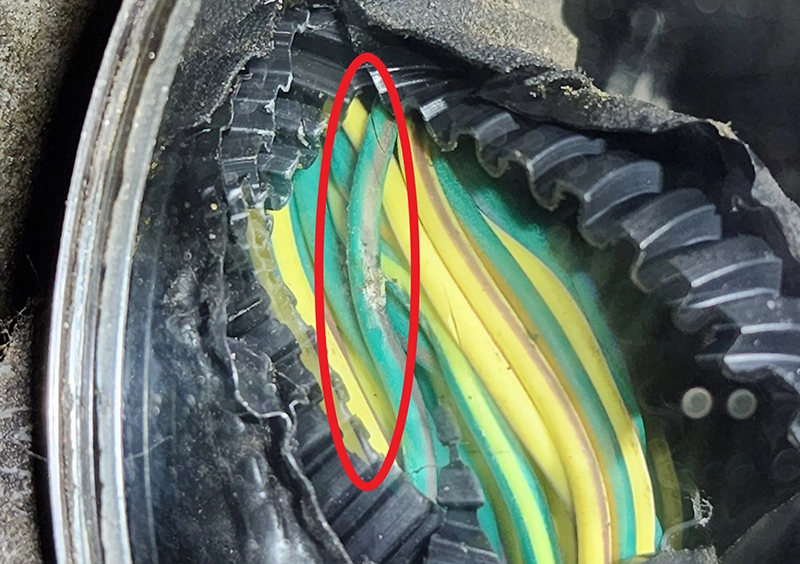
Figure 2
I repaired the wire and the vehicle performed normally after that. Since that time, I have had three other vehicles come in that were the same year and model and each of them had that same bracket starting to rub through, but none of them had ever set any codes or been in a failsafe. I just loosen the bolt holding the bracket and reposition it whenever I see one of these come in.
As with most intermittent concerns, the culprit was a hidden wiring issue. In my experience, wiring harness chafing or erosion is the top cause of these concerns. Take your time, be thorough, and be the hero.